URxvt.keysym.Shift-Control-V: perl:clipboard:paste URxvt.iso14755: False URxvt.perl-ext-common: default,clipboard
Search trees
This post will be a technical one. I have to retake my exam algorithms 2 in (Tiwi – Industrial engineer computer science – Ugent). I thought it would be nice to write about it, so here it goes. I will start with explaining what search trees are before explaining splay trees in more detail.
- Search trees – principle
- We start with 7. 7 becomes root since it’s the first element.
- We add 5 to the tree, 5 < 7 so 5 will be added at the left side.
- We add 10 to the tree, 10 > 7, so 10 will be at the right side.
- We add 8 to the tree, 8 > 7 so we go right, but 10 is already at the right side.
8 < 10, so we add 8 to the left of 10. - The problem
- In Tree 1 we go left once and get 1 this takes 1 operation
- In tree 2 we go left twice which means we have to do 2 operations.
- In tree 3 we have to go left 4 (!!) times, meaning we have to do twice as much operation as in tree 2 and four times as much as in tree 1.
- The solution – Splay trees
- AVL trees
- 2-3 trees
- Red-black trees
- Randomized search trees
- splay trees
- … (many many more)
- Top-Down
- Bottom-Up
- Bottom-Up Splay trees
- Splay operations – Bottom Up
- Zig & Zag
- ZigZag & ZagZig
- ZigZig & ZagZag
- So how does this work?
- Search
- Add
- Remove
- Top Down Splay trees
- Splay operations – Top Down
- Zig & Zag
- ZigZig & ZagZag
- ZigZag & ZagZig
- So how does it work ?
- Search
- Add
- Remove
- Finish
- notes
- I used gliffyto create the schemes
- I’m sorry if the drawings aren’t OCD proof
- All the elements in the tree are unique. Adding 1 element multiple times is also possible, but then the condition should be <= instead of = instead of >.
Note that there are multiple ways to implement this. One of them is randomly put a child left or right. Another is keep a counter in each node that says how many elements of that type are left. Also the searching algorithm must be adapted. - References & more information
- Splay Trees – Data Structures in 5 Minutes
- Splay Tree Animation
- Try the animation yourself
- Algorithms II – R. Stoop year 2013-2014 (dutch)
Let me start be explaining what a search tree is and how the most basic version works. A search tree is a data structure that allows you to quickly lookup stored values. The basic priciple is that a node is linked to multiple ‘child’ nodes. In this article the number of child nodes will be 2, making the search trees here binairy.
What you do is you take a series of items e.g. numbers: 7,5,10,8 and you add them. (Note that this are keys that refer to items for instance the numbers could be client numbers. The tree would then allow a program to quickly lookup clients based on their id.) The first one is the root node, the others become child nodes. If the child node is smaller the the root node we go right, else left. To construct the tree we do following steps:
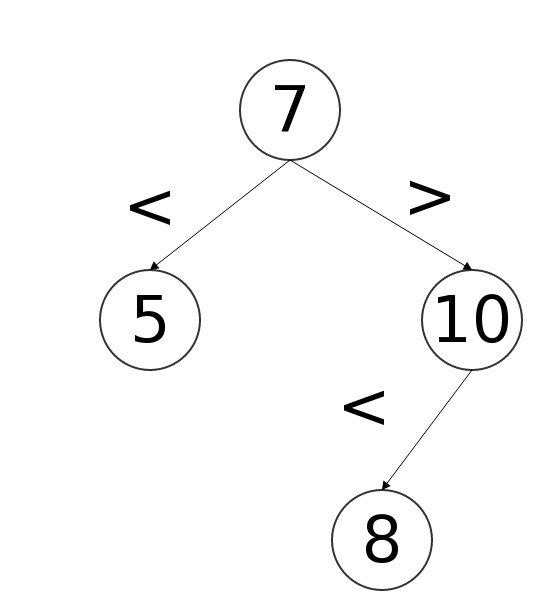
Tree 1: The basic Principle
What we try to do here is lower the lookup time thus lowering the height of the tree.
As you may or may not have noticed, the height of the tree here is determined by the order of the elements that we add. Meaning that if we add the same elements in a different order, we end up with a different tree. The best case scenario is (using the O() notation) h = O(ln(n)), meaning that the height of the tree is ‘defined’ by a factor * log (n).
The worst case scenario however results in h = O(n), meaning the height of tree is equal to the number of elements.
 Tree 2: different order = different tree |
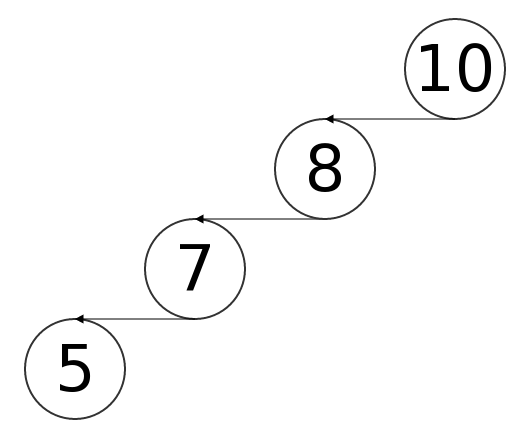 Tree 3: worst case scenario |
If we lookup 5 in the different trees:
It is clear that if we lower the height of the tree, the elements are beter organised. This will result in faster lookup times.
There are multiple solutions for this problem:
This post will focus on Splay trees, since my time is limited.
Note that splay trees, unlike Red-black trees, do not guarantee that every operation is efficiënt. They do however guarantee that a series of operations is efficiënt thus averaging out the inefficiënt operations.
A splay tree, will put the node that we search, add or delete at the root of the tree. Making operations for that node and his neighbors faster. Why? Well statistics show that when we want node A, chances are that we want to access child elements of A’s children too. Also when a node is accessed a lot, the node will be closer to the root element, making future operations on that node faster. This is done use splay operations; operations that rotate the nodes.
All nodes that we pass while descending the tree we will pass many nodes that are also deep in the tree. We need to change the structure of the tree in a way that moves all these nodes closer to the root elements.
There are 2 kinds of Splay trees
I will explain bottom-up before I explain top-down.
Bottum up splay trees will search the node by going down, as all basic search trees do. The searched nodes is then ‘splayed’ until it is the root node of the tree. This means that we need a way to know the parent of a node. This can be parent pointers or a stack.
Note that we can’t just take the node and place it at the root because we also need to move neighboring nodes to the root. We need to do this in a different way, by rotating nodes in 6 different kinds of operations. Since these operations are mirrored, i will divide them in 3 groups and only draw 1 of them.
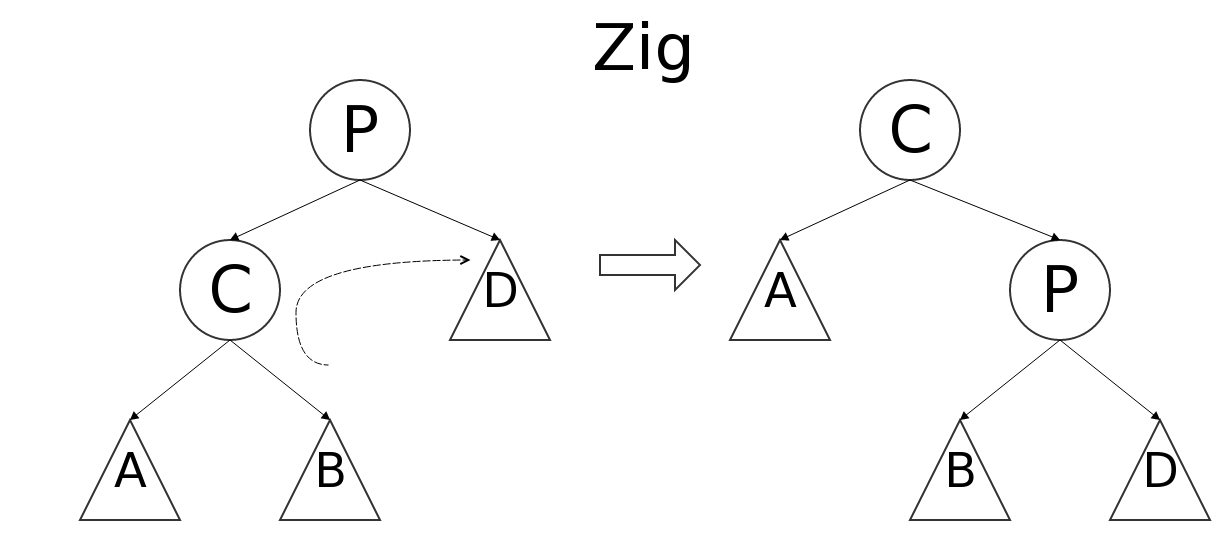
Zig operation
Here we want to rotate C upwards. A,B and D are sub trees that other from their root element remain unchanged. The Zag is the mirrored version, with C on the right side of P. This happends only when the parent of C is the root element.
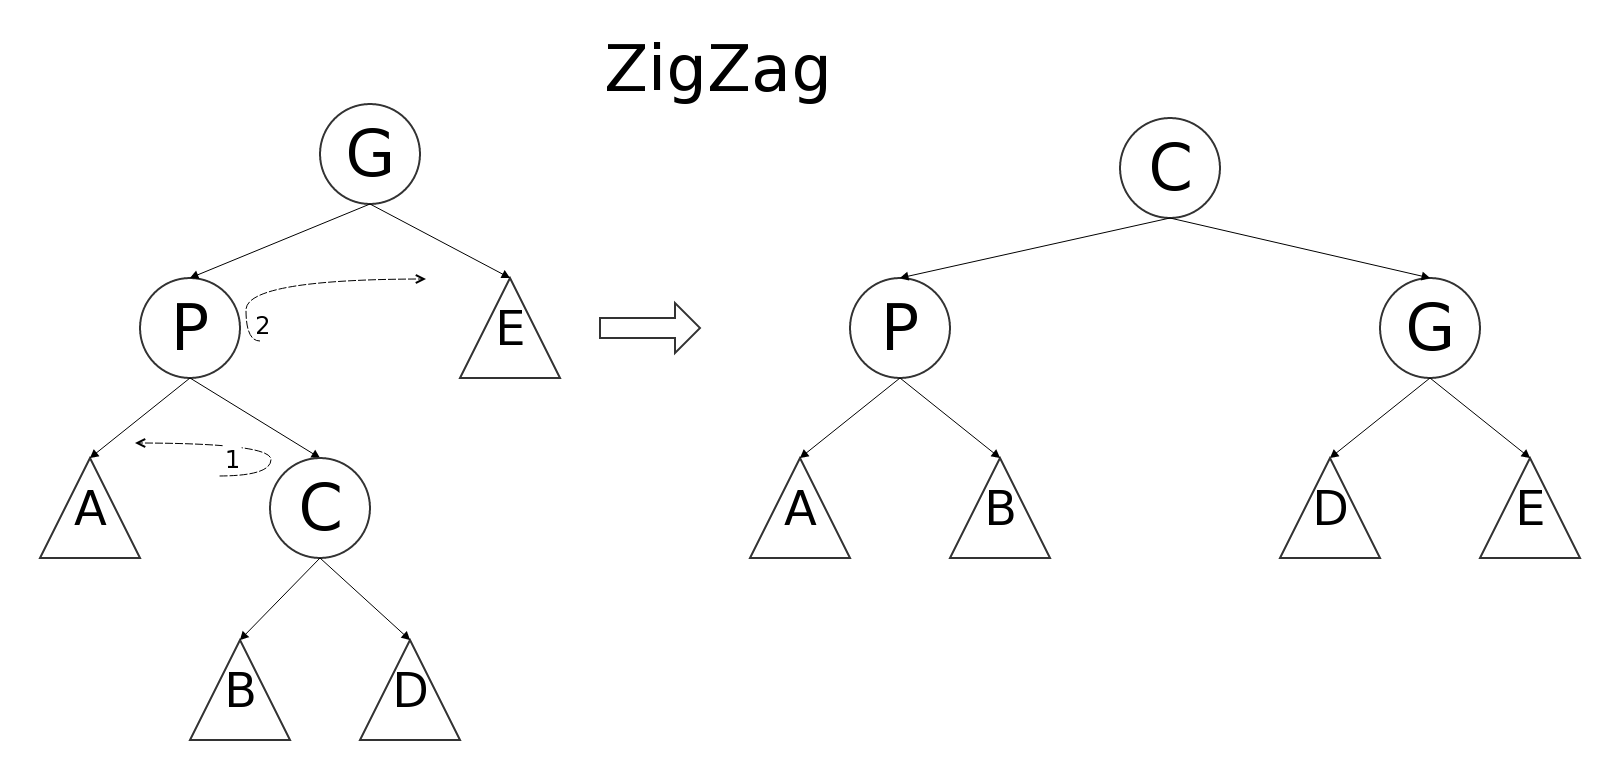
ZigZag operation
We do 2 rotations, first we rotate C and P , then we rotate the result with g. This happends when c has a grandparent, we rotate C two levels up. Note that g might also have parents.
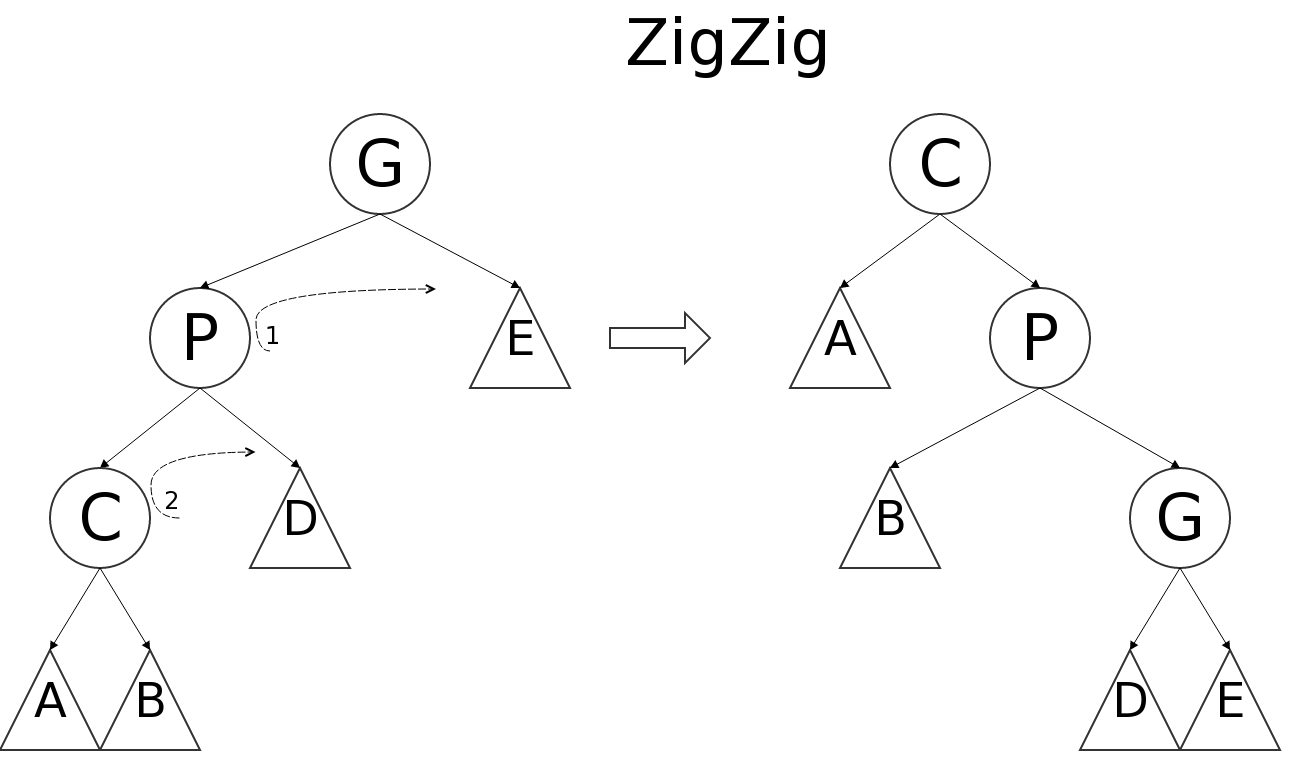
ZigZig operation
Her we also do 2 rotations: first we rotate P around G, then we rotate C around P, making C the top of the tree. This happends when c has a grandparent, we rotate C two levels up. Note that g might also have parents.
Well there are 3 different operations:
This is done like a normal tree. Once the node is found, the previous explained operations are executed until the C node is on top of the tree. We need to execute ZigZig / ZagZag / ZigZag / ZagZig multiple times until C is either root or one below the root. When C is one below the root we need to do Zig or Zag depending on the side that C is on. If the node that we search is not in the node we will find a null pointer in the ‘should be parent’ (the node that would be parent if the node were added). We proceed by rotating the parent up.
This animation shows the process pretty good.
First we add the node like a normal tree then we make the node root by applying the splay operations.
Once found, the node is removed, then his parent becomes Root. When the node is not found, his ‘should be parent’ becomes root.
Doing this will cut the depth of most nodes on the way in half.
You can try this here.
This versions of splay trees is somewhat faster sinces it splays the elements on the way down. While descending the tree is divided in three searching trees: L < M < R.
We start with M = the initial tree and R = L = null.
We also have 6 types of operations, divided in 3 groups (mirroring).
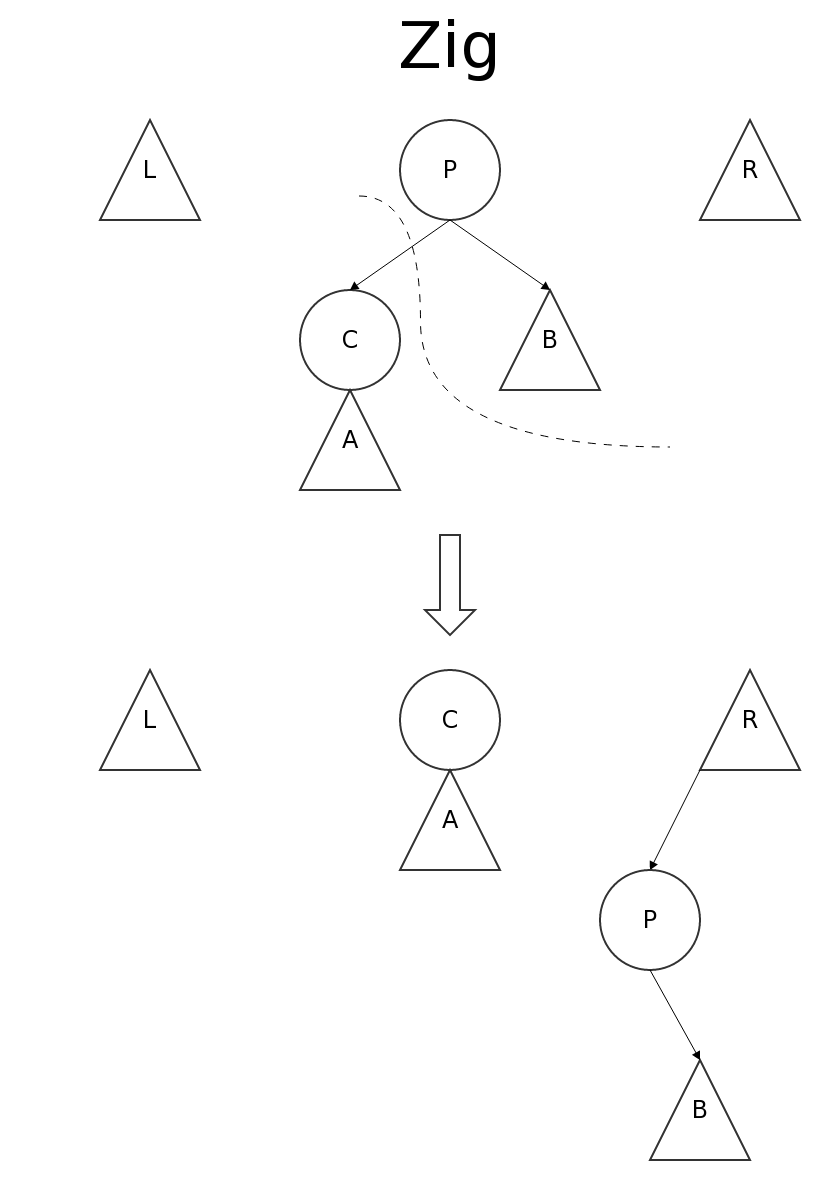
Zig operation
As you can see we move C up and since P & B are put in the L tree, since they are both smaller then C. (C is the top of A.)
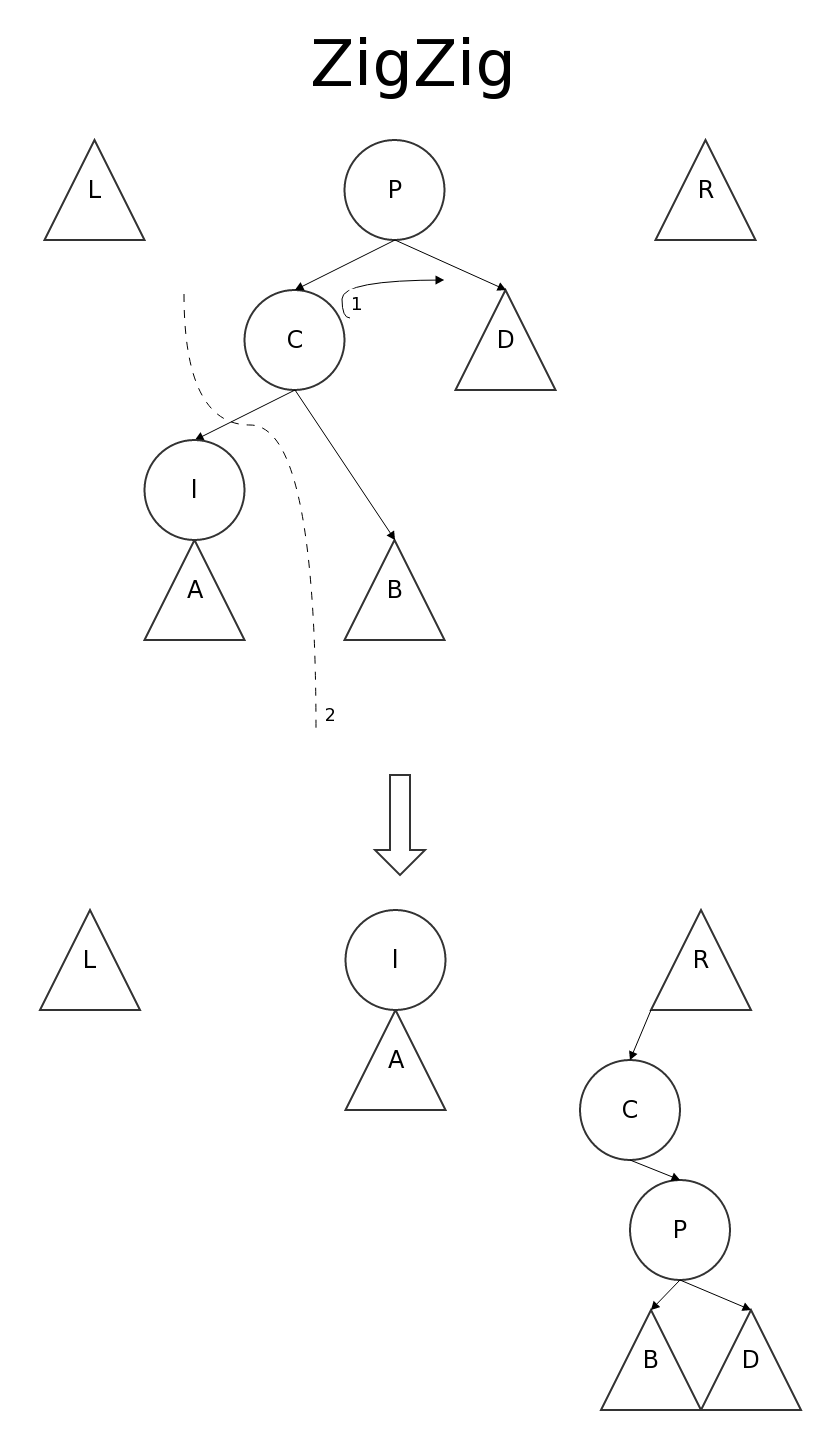
ZigZig operation
As shown above, first C is rotated upwards. Afterwards Everything smaller then l is cut off and placed in the R tree.

ZigZag operation
First P and D are cut off and move to the right tree. Then C and A are also cut off and put in the left tree.
Like Bottom Up, all operations are repeated if necessary until C is at the top of the tree. Then we need to merge L and R with the tree.
This can be archieved be simply linking L and R between C and his children.
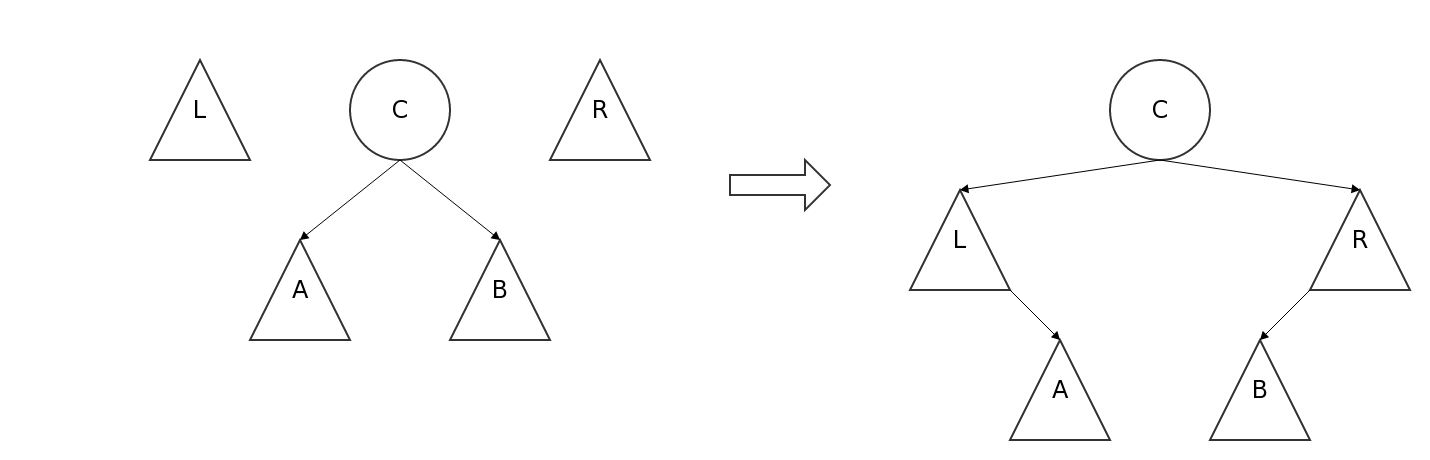
Merging TD tree
Searching will make the found node root. If the node is not in the tree, then his ‘should be parent’ will be root.
The difference with Bottom up is that once the node, once found, will be at the top of the tree. We don’t need to climb back up.
First the tree is splayed until the parent of the new node is on top. Then the node is added above the root. The old root with the left subtree is now the left child of the root and the right child of the old root is now the right child.
The node is searched and when found the root element (= node we want to remove) is removed. After that his children are merged thus creating the new tree.
To finish I would like to ask for some feedback on this post. This is my first real blogpost on this blog and I have a lot to learn. Still i believe you should get a pretty good idea what splay trees are and how they are used. If you have any questions or comments please leave them below.
Happy Coding!
Who is this guy?
Let me introduce myself first, don’t worry i’ll keep it short.
My name is Andreas & I live in Ghent, Belgium.
I’m 2 finals away from beeing an industrial engineer computer science.


Why should i care?
Well, you shouldn’t. I’m doing this as “practice writing” thing. While sometimes I really enjoy writing, I actually never considered myself a good writer. So please if you have any suggestions, post them below.
Why did I start with this blog?
I started this blog after I won the award for best blogpost / blogwriter of #oSoc14. You are probably wondering what open summer of code is. Well it’s, like the name suggests, a summer program for students to design, implement and present applications. The idea is that students work 3 weeks on a project during the summer. They start with the design and end with the presentation of the project. Afterwards, the source code remains available for anyone to improve it. The great news is that we actually get paid for this work; we get paid to learn new things! Awesome!
oSoc14 start in Leiedal, Kortrijk.
A part of oSoc is promoting your project. This is done by e.g. tweeting, contacting the press, writing blogposts. I wrote 2 blogposts, well actually i didn’t write the whole first post by myself, and won the blogpost award with my second post. If you want to know more or are wondering what i did there, then you should check my blogposts:
-
A sunny #oSoc14 start @ Leiedal, Kortrijk
About the start in Leiedal and the first application, Zerk Zoeker – a tombstone searching tool. -
privacy versus security, the question of the future
How the privacy regulations in Belgium influenced our ComProNet app.
